Here the last assignment of the Art of Photography module.
As always as a PDF file. I have to admit that I forgot to post it earlier but the tutor was happy about it!
Here the last assignment of the Art of Photography module.
As always as a PDF file. I have to admit that I forgot to post it earlier but the tutor was happy about it!
The exercise was to produce a single strong picture for e.g. a cover of a magazine with the theme RAIN.
That is very difficult I felt as rain can have so many feelings to it. From the more melancholy rain and the feeling of tears=raindrops to summerrain which most people associate with summer, warmth and pleasure.
I opted to shoot those two pictures that are more towards the melancholy feelings, one of my mother and the other one on a rainy summer day…actually midsummer with a lot of blank space for the title of the magazines and other captions.
Alternatives could be the picture of a person playing/dancing in the rain during summer or taking the scene from the movie as inspiration why not making one dance in the rain on a street. A close up of a face in rain, could either be summer and sun or in the mountains with heavy jackets on.

Through a car window with raindrops on it focus on them giving a slightly blurred version of the persons face. In that case my mother who said that she never had a nicer portrait taken of her. And that was the truth she said!

Very exciting!
Last part and I thought that i “just” about the last assignment as it is in DPP and P&P. But NO! 🙂
Very interesting theme!
Narrative and Illustration
First part has an interesting question: Putting the subject of treatment first….or to take different pictures. I observed a couple of times that I did not like a picture because of its “artistic value” or better said the lack of it but when I looked at it later on I liked the picture very much as it had a narrative component that might not have been possible with a more artistic picture.
You have to realize that both kind of pictures are equally valuable but in different aspects.
Looking further at the course materials the next part id “Narrative”
Telling the story and of course that means that you need to get as much information about it as possible.
What happens, where does it happen, when does it happen. That means both reconnaissance of the place, getting information of the subject/happening you want to depict but even get organisatory information, where can you stand, is it allowed to use tripod and so on.
I think it is very helpful to think like a possible beholder, what do people want to see?
Normally that means that I want to give an overview of the scenery/of what’s happening, maybe surroundings to give a greater picture. Closer pictures of different parts of the scenery/happening and then of course giving even close-ups pictures of e.g. musical instruments when photographing musicians, concentrated expression and so on. “Being curious as a child” as taught by the cognitive behavioural therapy is a good lead of thoughts.
The course material even describes the use of a picture-script, certainly something to adapt as it gives possibilities to think and rethink the event.
Below is the first exercise under “Narrative” showing a musical convention of people that can play an instrument and just gather in a certain place one weekend in order to play together.


Project “Illustration”
Expressing a story, feeling or something like that in a single picture.
Examples that are mentioned are e.g. a picture depicting DaVincis interest for anatomy, several pictures from the 1930’s that show life there and the depression.
Two pictures I found illustrative are shown below.

autumn, berrypicking, food, sweet

Love, nearness
We were asked to think about concepts that are regularly depicted in advertisements.
Illustration by symbols
Very straightforward but a problem that it might show a cliché, evoking a negative feeling or a bored one.
Of course you also have to consider that symbols are always related to the place on earth and culture you are in and grown up. as I wrote earlier on, white stands for purity and cleanliness in Europe but for death in asian countries.
Examples for symbols
Growth: Baby, small twig or flower, a field with corn
Excess: Money, bankers, actionsport, bodybuilding
Crime: Gun, mugshot, Mask, handcuffs
Silence: Library, snowy landscape, cemetery
Poverty: Homeless, damaged shoes, “Redneck”, dirt
Here now my fourth assignment.
The end is near! 🙂
As usual as a PDF.
Enjoy!
Just saw this video on Petapixel and thought it might fit into the lighting-scheme!
One of the exercises for the lighting part of the AOP-course is about shiny surfaces and avoiding reflections of the camera or lighting equipment. I even put on some pictures that I took when experimenting with DIY-snoots or other ways of diffusing the light.
As far as I can tell is it very difficult to just get it right. Very often is the light too big or too small in comparison with the object you are trying to photograph. Light spill or just getting reflections of the surroundings are difficult to get rid of and of course you have to think about what you want to show with just that object or subject you are photographing. It needed, at least on the level that I am on right now quite an amount of editing in order to get the pictures as I liked them.

First try of product photography. Light coming from the right and you have three versions. One with a reflector right, one without and one with a black reflector from the front in order to darken the front a little against the white background.
problem with partly too bright highlights.

s.o.

s.o.

Two tries at our wedding ring with light coming from the front, slightly from the right and at about the level of the camera. Problem with too bright highlights and not getting across the shape of the ring, even if the reflections are nice (plexiglas).

s.o.

Three pictures of a camera I have at home. Light this time from two lights, right and left, trying to adjust the brightness to get more light from one side and not get a too even picture. Problem with burned out highlights in some of the pictures and I am not really happy with how the form of the camera is shown. but the one with the hand is a pleasant one in my opinion but had needed a little more light on the upper side.

s.o.

s.o., thank you Johan for loan of your ideas and hand!
Next time we had a photo session we wanted to try something new and take pictures of a whiskey bottle and glass. Unfortunately is none of us smoker so we could not really create the still life that we all had in mind with a smoking cigar, a whiskey and maybe a good book. So in the beginning we tried to capture the bottle and glass i a pleasant way but when getting criticism of a friend he again said: Be aware what you want to show with the picture and how you want to show it. We did not manage so well to just show the form/rim of the objects but on the other hand I think we did well for the level we are on and some of our friends were very interested in tasting the whiskey, which in my eyes does talk for the pictures.

Light from both sides but main light from the right

single light from the right and a white reflector (the other softbox)

Single light from the right, softbox without light from the left som reflector

Single light from the right, softbox without light from the left som reflector

softbox from the right, directly from the front. Might have been better positioned for the glas if it came from a little further back, like 100 or 110 degrees. Nice light on the face

Hairlight from the left and mainlight from the right about 45 up and 45 right

s.o.
During that shoot I even tried to take some pictures of a watch but did not really have any good ideas on how to present it.

straight forward camera, light from the right and you can see both which is not so good.

Editing in Silver Efex “Film noir”

Same picture but just from LR.

Even tried to take pictures while it is on my wrist but I could not get it far enough in order to get better lighting on the steel ring around it and to avoid the reflection of the light on the glass.

s.o.
After the session with the whiskey we decided to go further with a timer made out of steel, creating different problems. the pictures here are from several sessions. Captions tell you what it has been done.

Evening in our living room without alteration to the light.

single headlamp from slightly above the camera right towards the egg.

single headlamp from the right hand side. some editing to get the “inside of the egg” without reflections.

Setup

Light from the right and a reflector from the left. Interesting the difference in light quality, soft/sharp.

headlamp directly down, reflector on either side but not enough effect to my taste

Headlamp above the camera with a snoot made out of drawing paper which you can see in the top

Headlamp above the camera with a snoot made out of drawing paper, higher than the one before, slight halo

Headlamp above the camera with a snoot made out of drawing paper same as before but different angle and different exposure gives a clearer halo on the top of the egg.

nightdesk lamp with diffuser of drawing paper from the right and white reflector from the left

On camera flash

on camera flash with a long “snoot” out of drawing paper that almost touches the object, slightly above the object

same as before but not clear why I got a double reflection. snoot differently rolled together and giving a different size light source?

standing on a plastic object in order to give a “flying” impression. No other lightsources or reflectors.

Same as before but with a white reflector from the left and increase of contrast to get this division of sides.

Desklamp from behind and down.

From behind and above towards the egg, not enough halo-effect though.

Headlamp from behind and above towards a point behind the egg in order to get the shape of the egg

single softbox from above

Equal strong light and distance from left and right. softboxar
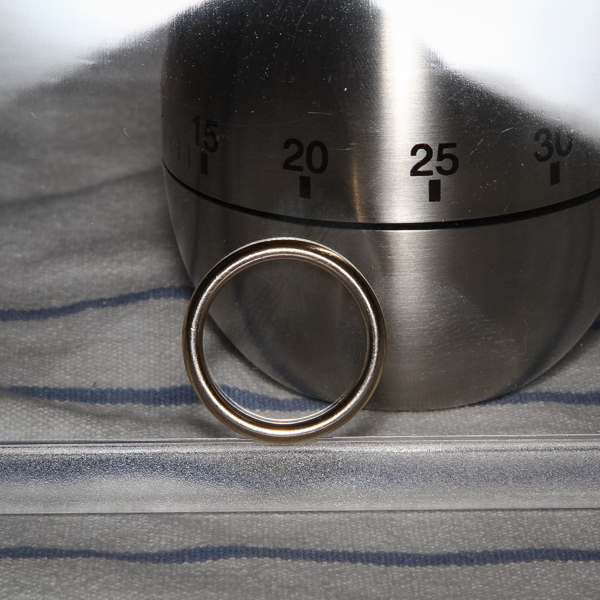
Now a ring I payed with in order to get the shape and to see how light modifier work

ring on a plexiglas disk to get it upright. on camera flash

closeup, shadow of the lens
Diffused on camera flash with drawing paper

On camera flash with snoot made out of card

closeup

On camera flash with snoot out of drawing paper., softer light and a little spill. not as harsh
Last but not least an exercise with a light source that was outside a cone made of drawing paper. I had some problems making one as I could not find drawing paper in town but managed to create something that lasted about a dozen shots. After that I took two large softboxes with tungsten light and as far as I can think the effect should be equal apart from that you do not get the reflector which is “built in” in the cone-setup.

On-camera flash

Direct light from near the camera, directional, no diffusion

Light from the top through the diffuser. Very soft shadow.
The red lines are the construct that hold the paper up.

CD instead of the egg, direct light

Light from behind the camera, several lights in the softbox with the diffusing material gone

Two softboxes on either side of the camera,

Softbox from behind.
As far as I can see is it very difficult to get rid of the reflection of the camera without moving the object and getting another angle of the camera to the object. Same problem as with the clock I think. VERY tasteful and pleasant light from the diffuser-cone as long as it lasted. With the surrounding paper it gives a very soft light.
As I wrote earlier on are there several possibilities to get light or shadow on the subject.
One is of course direct light, indirect light, when being outside in the shade but you can even inside use a reflector för reflected light.
When taking a reflector what you have to take into consideration is again that the light intensity decreases the longer the reflector is from the subject (but inverse square!) and that you get more reflected the more silvery the surface is. When taking e.g. on a Lastolite TriFlip you get a diffuser, shiny silver, less reflecting silver, gold and mixtures between gold and silver to get a warmer tone. BUT! You also get a dark side, in other words something to increase contrast and absorb light.
In the pictures down here I was mainly interested in how the light falls on the object without caring about the background. When looking at the pictures of Stieglitz and Weston on page 162 of the course material my thoughts are that those pictures are different in many ways and that I prefer the Stiegltz one due to the high contrasts that totally focus on the face and not on the Weston one…a picture I have difficult in liking.

Light from the right, no reflector

White cardboard from the left

Black reflector from the left

aluminium foil, shiny side, left

aluminium foil, dull side, left

aluminium foil, crumpled, left

Direct light from the right, no reflector

diffused light from the right, no reflector but unfortunately light from the window reflecting on the left side of the camera.

white cardboard, about 10 cm from camera

white cardboard, about 20 cm from camera

white cardboard, about 40cm from camera

Crumpled aluminium foil, about 10 cm from camera

Crumpled aluminium foil, about 20 cm from camera

Crumpled aluminium foil, about 40 cm from camera

Black reflector about 20 cm from camera

Black reflector about 60 cm from camera
Now to the next part of the light, the lighting angle, I think the most difficult of the possibilities to change.
The exercise was to take a picture of a person with light from different angles (0, 45, 90, 135, 180) on both eye level and about 45 degrees up over the head of the subject, pointing down to it.
As I was recommended by a friend I started of with a small light source with very directional light and then I switched to diffused tungsten light I borrowed of a friend.
I did not do any editing to them apart from sharpening, slight vignette and lens correction. No editing in order to see and show what comes right out of the camera at different angles and different distances without me having the chance to “water it down” with editing, dodging or burning.
What I could see was that the contrast was increased with a smaller light source, having it further away (making it smaller that way) and increasing the shadows by using a black reflector.
Thanks to Nina who was tired after a day outside on the farm and nonetheless acted modell.

Naked light, front, strong shadow, unattractive

naked light, 45 to right, lite lightspill on left side, hard shadows

naked light, from right, face cut in half,

naked light, 135, a little too much spill on her cheek to give a good hairlight, reflections from the room lightening up her face

naked light from behind. Halo around her. clearly separated from bakground

Naked light, front, 45 up, less feeling of a headlight of a car but hard shadows under her chin and nose

Naked light, 45 up, 45 right. Rembrandt.
Naked light, 45 up, 90 right. Face again cut i half but better shadows from her glasses

Naked light 45 up, 135 right, boring and too much spill on her face. Maybe wrong angles?

naked light, 45 upp, from behind. Too much light and too direct form behind to give an interesting view.

diffused from front, reflections in her glasses ans shadow of camera in them. Softer shadows

diffused, 45 right, softer shadows

Diffused, 90 right, face cut in half but more pleasant change of light from light to darkness

Diffused light, 135 right, maybe not enough from behind. Much spill on the face. Would have been better to go a little furter back.

Diffused, from behind. Silhouette

Diffused, 45 up, softer shadows and softer change of light, still not very attractive, shadow under chin

Diffused, 45 up, 45 right, Rembrandt. attractive

diffused 45 up, 90 right. Softer shadows, better shadows of the glasses than with naked light or from the side.More “stress” on the hair.

Diffused, 45 up, 135 right, better than the one in eye level, probably little further back. Interesting!

Light too close to the subject, highlights burned out. in this case better with spill on her face. unattractive lighting though.

first attempt to get a picture with 45 up and 45 left on 3/5 power, 45 up and 45 right on 1/5 power and naked light on the floor directed on the hair and chin.

s.o.

Diffused light 45 up and probably 35-40 right, reflections just from the room.
Now the course has come to the ultimate in photography….can one call himself photographer without billions of flashes and other lighting equipment? Not when thinking as the general public.
Big cameras and the more flashes the more professional the photographer. Is that true?
As you can guess….NO!
But photographic lighting is a big, big chapter in photography.
Looking at light meant looking at artificial and natural light, then came the available light, often a mixture and now the photographic, often artificial light. When being there you have to think about balancing it with the ambient light or going to the studio where you can control everything.
One of the advantages of studio/photographic light is that you can control everything. One of the disadvantages is that you have to control everything.
That means you have to know what you want.
Looking at the light you can think about the colour, the quality (hard, soft), direction, intensity. You can get that by having a lightsource of reflecting it of something like e.g. a reflector or another shiny surface.
You have to know how and what you want to show with the subject or object you are taking a picture of.
Looking at Irving Penn: Still Life: Irving Penn Photographs 1938-2000 av Penn, Irving, ISBN 9780821227022
I think one can clearly see the thoughts of the photographer behind the pictures. Looking at a master of portraiture Yousuf Karsh (www.karsh.org) you see the same precision in the pictures.
According to the coursematerial you can get three different lighting-equipment-sets for photographic lighting.
On-camera is almost always unsatisfactory photographically.
Off-camera portable flash is usable but according to the material has the disadvantages of being too weak when e.g. diffusing them, often lack of fittings for light modifiers and not to forget that you do not have a modelling light, in other words you cannot see how the light is going to fall before you have fired off.
On the other hand are they highly portable and affordable in comparison with battery-driven flashes. Looking at http://strobist.blogspot.se/ you see what amazing things can be done with them.
Tungsten lighting is a good low-budget alternative and WYSIWYG…What you see is what you get. in other words the light that falls on the subject is the light you can record, not having to care about flash-intensity and so on. Advantage is also that you do not get the extra tension of flashes going off in a short amount of time when doing portrait-photography and the model can relax and don’t have to feel as being on the red carpet. Disadvantage is that they tend to get warm which minimizes the availability of light modifiers to those that are heat resistant.
Main flashes, everybody’s dream?
It to a certain extend is for me. Advantages. highly modifiable, strong (can “get rid of the ambient light”) and look professional. On the other hand often very big and need electricity or they get very expensive when looking at battery-driven ones. Prices are from 200 £ to several tens of thousands.
When interested in it:
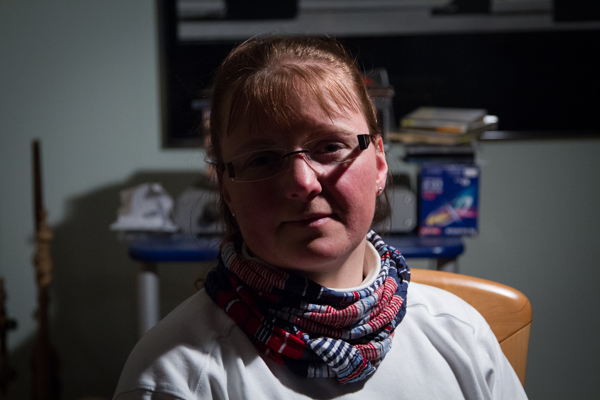
Just to show some pictures in all the text a picture of me by Johan (u1photo.com)

off-camera flash from the right, no modifier.
(c) Johan Niklasson
Intensity
Physics, nothing for you?
You have to keep in mind though that light changes according to an inverse square law when changing the distance.
Quality
Softness/Hardness depends to a vast extent on the size of the light source. The sun, though being very large is just a tiny spot in the sky and with that giving hard light when not having its own diffusers in form of clouds.
You get the same problem with photographic light so that you have to decide if you want to modify its softness.
Down here two pictures of a timer in steel, one with direct light from the top and the other with a sheet of tracing paper between the light and the timer. The red reflections you see are the support of the tracing paper. I did not do anything about it as the light was the interesting part in this exercise.


Can you guess which one is which?
Secondis the un-diffused light, harder borders between shadow and lighter areas, faster decreasing of the light, lightsource looks smaller than on the other side.
Within the first picture you got more diffuse shadow, light is getting slower and more pleasant darker.
I prefer the diffused version but I think undiffused has its uses when wanting a more “edgy” look.
Looking at available light means that you have to think of it as natural or artificial light. Most of the time, in our civilized world we have a mixture of both, unless of course it is pitch black and you only get artificial light or from dusk till dawn where you can photograph without artificial lights.
Of course are there exceptions to that. Northern light is one or a clear night sky but even there is a mixture of light sources more common than uncommon.
Looking at different scenarios and especially the white balance (WB) in them you get characteristically colour casts in sunny places, shade or on cloudy days.
Most of it has been done under the DPP-section.
https://afraudi.wordpress.com/2012/10/10/colour-cast-ans-white-balance/
So to sum up: Shade and overcast days are “bluer” in WB, something that might have to get corrected but keeping in mind correct is not always attractive.
Looking at shady places or overcast days it gives other possibilities that you do not have on sunny days because clouds are the “ultimate” diffuser, giving a very soft light without too harsh shadows.
Down here are some examples of a trip I had with some friends on a cloudy day along a river that was in a lighter forest, in other words two diffusers.
I took them in RAW but converted most of them to black/white as I liked that it focused the view on the structure and texture in the frame, rather than colour. One of them is in colour showing the possibility of longer shutter speeds and a river. Here you can also see that the colours are soft but rich and not as “watery” as on sunny days at midday.


Now the comparison between sunny and overcast, between me and my father.
Lightintensity is about 3,5 f-stops difference and one can see the difference in WB very clearly.
Advantage with overcast days is that the person you are taking photographs of do not have to squint and gives softer shadows. Those two pictures are o.k. as they are and I would not have moved my father to the sun in order to get a better picture. Me on the other hand would have profited from moving to the shade I think.


For the last part we were asked to look at weather and the possibilities that come with it.
Snow have you seen quite often in my pictures as we have it about 6 months of the year. The IceHotel is an example how the weather and snow has created photo-possibilities.
Down here are some pictures taken during rain. One shows my mother behind a car window and she herself said that this is the best shot of here ever. I decided to focus on the drops rather than the face in order to give even more anonymity. The second one is a grass straw after the rain with drops on it. In black and white to focus even more on the structures in the frame.
After that are four pictures of puddles during the rain with different shutter speeds. One has even movement blur but I prefer that picture to the more sharp ones, even if i do not know why.


