Archive | Exercises RSS feed for this section

Capturing the moment

8 Jan

This exercise is about the “decisive moment” as Henri Cartier-Bresson called it. Iconic is the picture of the man jumping over the puddle in Paris, well known or so many of his other pictures where you just see a person in an otherwise abandoned streetscene.

You either can anticipate that something is going to happen and stand ready with the camera, waiting for it or you shoot first and decide then what is the right moment.

Anyhow it can be a of value to have the camera in the Auto-setting or having pre-set to a special situation and even have it focused in order to be quick when the moment comes.

Down here are some of my decisive moments.

First picture showing a scene from a “renskiljning”, where the reindeer are collected, marked and in the end some of them are butchered. It takes quite a few exposures before you get just the right moment of them throwing the lasso. Here luck and a reasonably fast camera helped.

IMG_5707

The next two pictures are, as probably anyone can guess a wedding with the father of the bride holding a speech, one of the important moments during that day and then of course the obligatory kiss. Maybe a split second too early?
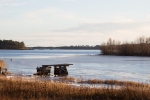
IMG_6611“Seadog”

When taking pictures of animals, especially in combination with sports the moment is the most important thing. Here Svante that is just in the right position and phase of the jump.

Other examples could be e.g. Icelandic horses, who, when competing against each other are judged by the quality of their gaits and that of course means getting just the right moment when all legs are at the right place.

IMG_7366

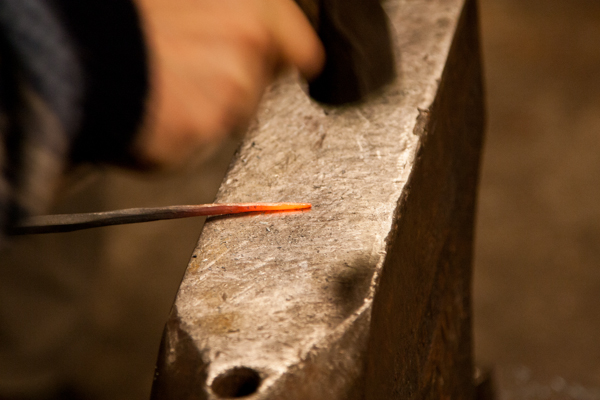
Below is a scene when a friend taught some other friends how to do metalwork. Here the boy hitting the hot metal on the anvil to get an impression of the scene and in the second picture a more close up. I even got pictures of the hammer just hitting the metal but that did not look as good, I guess because of the small size of it.

IMG_9086

IMG_9092

Developing your confidence

2 Jan

This first exercise of the “people unaware” part is about going away from the formal portrait and getting more comfortable taking picture of people that may be unaware of that and learning to describe in a documentary way.

I chose for that exercise a wedding of my wife’s cousin as I was asked to document the garden party after the actual wedding.

About ten percent of the people knew whom I was but as it was a very positive atmosphere I was feeling confident that I could take the pictures without ruining the party and capturing the event as it was.

I took about 900 pictures but chose to show just a couple of them.

My intention with those pictures was to show a little part of the whole evening, starting from the people arriving with hugs and kisses as well as gifts and then playing, eating and then in the end the last gift that the couple got: a painting done during the party of their friends depicting apples. Important to me was also to show the variety in ages that were there.

(click on the pictures to get a bigger version)


When looking back I felt not that comfortable in the beginning as they did not know me and probably were not expecting a photographer at the garden party but my experience as a doctor helped to just go for it and “do what has to be done”. After a while it got better as I did not encounter any negative feeling and just positive people. As time went along I decided to get a mixture of both documentary style pictures, in other words without them knowing or ignoring me and I also wanted to get some shots of the people looking into the camera so that the newly wed couple had even a document of who was there.

As I am normally easy going and don’t have problems getting contact with people this exercise was easy and I think I could have explained “my way out of it” when someone had objected to being photographed or had questioned my intentions with taking photos of e.g. children.

RAW

5 Dec

This is the first exercise in this part of the course.

As the title says is it about RAW-files and more exactly about the difference of RAW and JPG.

We were asked to take three pairs of pictures, one in daylight, one inn artificial light and one in a high-contrast situation. The pictures are supposed to be taken in a combined modus of Jpg and RAW.

The first pair is the high contrast pictures showing the house of my parents. The first picture is the RAW version and the second on is the JPG.

Differences are in my eyes that I was able to get structure back in the shadows and a little bit in the highlights. The JPG version on the other hand did not provide the possibilities to adjust it as well as the RAW version. I could have lightened the shadow area but that would have meant loosing information there. As I tried to get the highlights back it showed that it was completely blown out, not even the slightest information could be retrieved in the JPg but a little bit in the RAW image.

I even adjusted the white balance in the RAW-version to a more pleasing and warmer tone.

IMG_0137-2

RAW

IMG_0137

JPG

The second pair is the outdoor shot, showing again my parents house. AS you can see in the first picture, which is RAW the sky has been darkened a little in order to give some more texture and feeling of sky where as the ground around the house and house has been lightened to have a more pleasing appearance.  The problem with JPG in that case again is that you have to decide if you want to expose for the ground, which leaves you with totally blown out sky or the other way round getting a nice sky but too dark ground and house.  I tried to adjust the JPG picture but was not happy with the outcome as there was no information left in the sky to give realistic appearance.
The white balance was pretty much how I wanted it, so just minor changes.

IMG_0149-2

RAW

IMG_0149

JPG

The next pair of pictures are actually three pictures, showing more extensive editing due to an error I made when taking the pictures. As I normally shoot RAW I tend to forget to check the White Balance, giving a horrible greenish tone in the image in that case. The lamps are blown out, as expected but there is no problem with that because they contain no valuable information.

The second picture has an adjusted WB for tungsten light. The third picture has adjusted exposure with keeping structure in the highlights. Trying to do that with the JPG-version proved to be unsuccessful.

First test JPG

First test JPG

RAW with corrected WB

RAW with corrected WB

RAW with corrected exposure.

RAW with corrected exposure.

Review a portrait sequence

6 Nov

The subject of this exercise is to do a portrait session, a formal one, in a consistent setting and framing.

Johan, my model, and I decided that we wanted to do a shoot at the local concrete factory that lies in the harbour area of Luleå. To help you orientate I have taken a picture of parts of the place.

We were most of the time with the graffiti as a background but Johan was eager to change place and pose.

We started of in the direct sunlight but giving too hard sunlight made Johan squint so we decided to get into the shade. To get some light into his face Johan suggested to have just the nose getting light but we abandoned that rapidly but there were some usable pictures we took, with him crossing the arms in front of his chest, looking into the sunlight and the sum of pose and light, looking into the light was a nice outcome.

The post with hands on his hips just did not fit to Johan and in combination with the light we went a step back into the shade. Just standing there was nt a good alternative so I asked Johan to lean against the wall and we tested several combinations of looking away or into the camera for the eyes and the head.

We thereafter changed background but again the just standing there again was no good. It looked as if Johan did not know what to do with his hands. The next step was to have the hands in his trouser pockets but the light was not satisfactory so I asked Johan to step closer to the wall to get some light reflected from there onto his face. He also changed pose to bow forward a little in the hips and lower back. That was better but did not fit to what I wanted to have from the pictures.

Thereafter I asked Johan to stand in front of the metal door, that in combination with the walls on both sides created a nice frame for him to stand in. He chose his favourite leg to stand on and had hands in his pockets. That was close to what i wanted to get but before we could get on he had “run” and wanted a sequence of him going on the dock with the city in the background. After that I asked him to go into his corner again and after some cleaning of bushes we continued shooting again were we had stopped earlier. I did some finetuning of his pose with having him leaning the head a little to the left and that gave a very nice picture of him.

We did not test different facial expressions as the picture shows him as he is. A well educated, serious but happy and open person. Different poses with his arms, like crossing in front of his chest or having them on his hips did not fit into the “theme” of the picture.

After this sequence I wanted to show him as an industrial magnate, posing in front of his factory. I therefore lay down to make him via the angle bigger and have the factory in the background. He looked in the camera but that did not match what I wanted to show. He had his hands in the pockets, giving him reassurance. Looking out towards the sea He then looked as if he was prepared to any challenges that might come. Finally a little closer framing and different position of arms but that did not give any new aspect to the pictures.

Focal length

6 Nov

Depending on the focal length you can get very interesting but even very bad results. I took several shots from 11 mm to 400 mm of my friend Johan.

As you can see using the wide-angle lens means that you have to get very close and get distorted pictures. The longer the focal length the farther you have to go away from you subject but the more flattering the picture can become.

Advantage of longer focal lengths might be that you can get a shorter DOF as it decreases the longer the focal length gets and that the structures in the picture and face seem to  be nearer then they are. You get even better proportions in the models face.

Shorter focal lengths, in other words shorter than a “normal” lens you get more distortions in the face that can be used in specific pictures, with e.g. a humoristic touch, but not necessarily in “normal” portraitpictures.

400 mm, nice short DOF with f 6.3, face might look a little flat

190 mm, f 6.3, little wider DOF but pleasant result

105 mm, f 6.3, even wider DOF, nice proportions of the face.

24 mm, f 6.3, starting of distortions, if I had used a full frame camera it probably would have been too distorted to use, but as I have a APS-C sensor it still is usable. Background can be seen clearly now.

16 mm, f 6.3, even more distortion.

12 mm, f 6.3, not usable if you don’t want to have a humoristic picture of Johan.

Expression / Eye contact

5 Nov

It is very difficult to decide what kind of expression you subject should have. Everything from smiling, joy, fear, boredom and so on can be used. Often when shooting a portrait  of a person that is not used to standing in front of a camera you have to guide him or her through it. Expression there could be e.g. smiling, sad or neutral, depending on what the picture is used for. You also have to decide if you want the subject to look into the camera or if  he should look away, maybe just the eyes or the whole head.

When taking pictures, as in a normal conversation you should not hide yourself behind your camera but communicate openly with your subject. Maybe even invite her or him to come with own ideas. During the session it is valuable to show the pictures taken so far and reassert the model.

Down here some pictures from my session with Johan. Eyes and head both away and towards the camera.

Often when looking away with both eyes and head it looks as if the camera is just looking and recording, while you are nearer when the subject is looking towards the camera. When having the head towards the camera but the eyes away it often gives a shy impression.


head and eyes both away


Head away, eyes toward the camera


Head and eyes away


Head and eyes to the camera


Eyes and head away


Head away and eyes to the camera


Head and eyes to the camera


Head and eyes away


Head and eyes away


Activity

5 Nov

A good alternative to a “standard” portrait shot can be a shot while the subject is doing some activity. That way they are not so concerned about the camera.

Classic shots would be an interview shot, e.g. a person sitting at a desk, books or other things realting to the subject behind and around him. It looks as if the subject is talking to someone or explaining something. Important is it to have a fast enough shutterspeed in order to avoid blurry hands because of movement or to have hands in front of the face.

Alternative shots could be contextual shots, subjects in the environment you want to show them in. A surgeon in the operating theatre, a gardener with flowers, and so on. That way they “feel at home” and you can get more natural pictures.

Down here are some of my attempts at people in activity. I chose to take Johan in his role as photographer as his role as a medical doctor would mean going to the hospital where  we are not allowed to take pictures and a picture of him in his greens on the churchyard might have been a little macabre.

Apart from the photos here there are more pictures in the “experimenting with light” section.

Johan as he works, not that usable due to him covering his face with the camera. An alternative would have been e.g. to shoot him in the studio with the flashes showing that he is a photographer.

Johan the paparazzo. When asked to pose for me he instinctively took that pose. A mixture of a paparazzo and Quasimodo, when not looking for a humorous side of the trade.

An alternative to the paparazzoshot. I lke that he is clearly a phtographer but looking away, even if the light is badly chosen. The door gives a frame for him

Johan took a portrait of me leaning on the shovel instead of me digging. That way you can see the person and due to the surroundings and accessories can see that he must be kind of gardener or communal worker.

Light

3 Nov

Lighting in portraiture photography can be really important, especially when looking at marketing or formal portraits. On the other hand can “rough” and “dirty” lighting give another edge to the pictures in e.g. documentary photography or when taking photos in certain environments. Christer Strömholms pictures from Paris could be one of examples or Nan Goldin.

When looking at light you have to look at ambient light and photographic light. Ambient light can be natural light or artificial light, just the light that you find in a location that can be modified by e.g. a reflector.

Photographic light can be e.g. flash, fixed light with different accessories to modify the light like a snoot, umbrella, softbox and so on.

Looking at natural light you have to differentiate between shade and sun or an overcast day which has about the same quality as a picture in the shade. Taking pictures in direct sunlight can be good for giving you shadows, contrasty and rich colours. On the other hand it can be too hard, making your subject squint or leaving unflattering shadows in the face, setting the eyes in deep shade, and so on.

Shade or an heavily overcast day does not have those problems but it leaves often flat pictures “without texture” to the face, leaving no accents. The use of flash or a reflector can give back just a touch of light to modulate the picture and the person.

This exercise was to experiment with different light forms and produce four to six different pictures. I also added some of the not so flattering pictures to show what not to do.

Medium softbox on the wall behind Johan to free him from the background, flash with snoot on his face from the left.

Shot from below, natural light from the right. A little too bright, leaving Johan squiting but no other unpleasant effects.

One minute exposure time. Painting with a flash light and the spill light on the wall, due to standing right against it, is giving a surrealistic impression.

Standing in the shade on a bright day. Postprocessing just darkening the shades and blacks while retaining the highlights and whites. The head “standing out” light-wise is enough and does not need any other light modification.

Half in the shade, just coming out, leaving just a small patch of light in the face. Due to Johan looking towards the light it is OK I think to have just this light. Otherwise it would not have worked. I get a little the impression of “he is awaiting something”

Sitting on the porch of a church house. Light coming from the left, back. Johan does not have to squint as much and the white house on the right of him (outside of the picture) giving just enough light on the face to not make it too dark.

A spontaneous shot in Johans kitchen. Window on the left hand side behind him and a window to the right, white wall reflecting to the left side of his face (as seen from the camera). Nice even lighting with a little hairlight.

Just natural light coming through the springs and windows of a barn leaving kind of a spotlight-lighting and interesting shapes on the floor.

Standing in the shade, light only on the nose. Not flattering

The shots below are taken by Johan Niklasson in order to show the use of off camera flash in the shade to get a more interesting light.

First picture, sunlight from the right, unflattering shadows and me squinting

second picture, in the shade. Flat but definitely an advance against the first picture.

Third picture, this time with off camera flash to give a little accent

Thinking about location

2 Nov

Locations, I guess, are important as a setting for the shoot and to give the model something to interact. Sometimes just an interesting wall can be enough to give a nice setting, sometimes it needs more, like a museum, nature, boulders, trees, and so on.

I have a couple of months ago begun to mark my locations in a Google-map, sometime with a picture, often without it because I have the scenery in my head.

Because of the lack of mobile lighting equipment I am mainly depended on good natural light. Often are the shots “doable” in spring, summer and autumn. Winter is often too cold and to dark to get good shots outside or inside.

Other places are just too crowded to get a calm environment to work in.

One solutions is the studio of Johan that can be borrowed but that is also very small and crowded.

Down here you can just see some of the impressions I have shot on locations.

http://goo.gl/maps/a6VYW

The session asked for in the exercisedescription can be seen later on. It is located on the Betonwerk.

Checklist for a setting:
(page 14 coursematerial)

  • Is it reasonably consistent in tone and feature?
  • Does it complement or contrast with the person?
  • Does it need tidying and cleaning? Look for scraps on the floor anything obviously disordered, drawers left open, doors ajar, and so on.
  • Are there unnecessary distracting objects in view? Look for strong clashing colours, images an/or words. Do they add or detract?
  • Things sticking out of the models head? Powerlines, …


Types of portrait framing

2 Nov

The classic portrait composition is head, shoulders and torso. Just head and shoulder and in the end just a headshot gives different possibilities and things to take into consideration.

As all three of the framing are very close the head and expression/eyes take a strong role in it. The further you go away, meaning the more of the model you have in the picture the more the overall impression gets more important.

Often having the head looking straight into the camera in combination with straight shoulders a very static value while tilting the head can give more interest. Turning away from the camera with you torso and then looking back with eyes or respective head gives a more flattering impression.

Camera position should be slightly above or around eye-level of the subject. Of course can there be reasons to shoot from below the head to give more feeling of size to the subject but can be unflattering when e.g. having a double-chin.

Just a head shot has the problem that you have to focus very accurately on the eyes because they are normally the most interesting things in the face.

When shooting portrait pictures you often have a very short depth of field and a miss in focusing can destroy an otherwise fine picture.

When moving further away from the subject you have to deal with the problem what the subject should do with his/her arms and legs and what pose they should intake. People not being used to standing in front of the camera can be guided to e.g. stand on their favourite leg, lean against something, giving them some security.

Body language is then normally more important than facial expression due to taking up more space in the frame.

Headshot

Two headshots with different lighting. The glasses take over a little of the attention in especially the second picture due to the shade the eyes are in but in the first picture the eyes are the most important feature.

Headshot


Head and shoulders, Johan leaning against a tree to give an impression of the surroundings without being too distracting. Again the eyes main interest (too bad that the sun was too bright for a good shot). The head and shoulders forming a triangle with apex at the top giving a steady impression. The vertical lines of the tree giving even more static.

Head and shoulders


Torso, cut above the waistline, just having the arms in the frame, crossed in front of his chest. The pose came naturally to him when leaning against the tree. The pose being closed leaves again the main interest in his face, maybe at second glance on his watch.

Torso, cut off above waistline

Torso, this time cut off below the waistline giving a better idea of how the person is standing. The crossed arms showing strength and steadiness. In combination with the smiling face though not too aggressive. Manly? He is cold?

Torso, cut off below waistline


Full figure, this time even having the legs within the frame. Looking not as aggressive as the shot above, more like he is leaning against the tree and waiting for something, having the arms crossed for comfort and not to express aggression.

Full figure